
Page 81 - Enchiridion 4.0 program_EN
P. 81
Strategic Partnerships for school education 2019-1-PL01-KA201-065137
Project: Teacher4.0 - comprehensive method of implementation of Industry 4.0
concept into didactic practice in primary and secondary schools
not depend on the size of the model but on the complicated form. This format is the basis for
working with all types of 3D printers.
3. Cutting into layers
Before this task, having saved the model in the STL file, you should position and set the orientation of
the 3D model on the work table, then you can use the slicer program (slice - in English). There are
many programs on the market that allow you to do this. This type of tool is for example Slic3r but not
only. The task of the software is to convert the object from the STL file to the format understood by
the printer. This is done by converting the model into individual layers. The idea in each of the
programs is similar, while the individual software will differ in the way it is used
4. Generating a G-code that will contain a tool path layer by layer with previously selected 3D
printing parameters, such as material, temperature, cooling, speeds, layer thickness, etc.
G-cod is the result of writing instructions for the printer, allowing it to understand how our model
should be made. It contains all the parameters in which the print is to be made along with paths for
each layer.
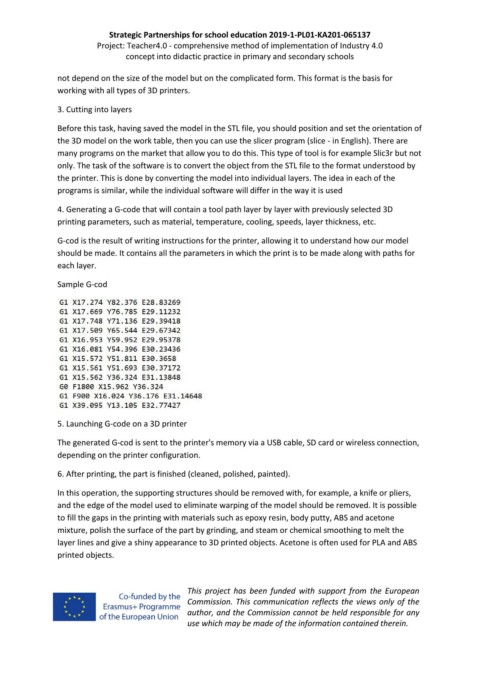
Sample G-cod
5. Launching G-code on a 3D printer
The generated G-cod is sent to the printer's memory via a USB cable, SD card or wireless connection,
depending on the printer configuration.
6. After printing, the part is finished (cleaned, polished, painted).
In this operation, the supporting structures should be removed with, for example, a knife or pliers,
and the edge of the model used to eliminate warping of the model should be removed. It is possible
to fill the gaps in the printing with materials such as epoxy resin, body putty, ABS and acetone
mixture, polish the surface of the part by grinding, and steam or chemical smoothing to melt the
layer lines and give a shiny appearance to 3D printed objects. Acetone is often used for PLA and ABS
printed objects.
This project has been funded with support from the European
Commission. This communication reflects the views only of the
author, and the Commission cannot be held responsible for any
use which may be made of the information contained therein.